Showing posts with label The Artistic Stamper. Show all posts

Wednesday, 30 September 2015

New workshop dates!

I have two new workshop dates to announce. Both workshops we will be creating a Christmas Poinsettia Wreath using my new Designs by Georgina Poinsettia Wreath chipboard kit.

Firstly I will be at That's Crafty, Romford Essex on Saturday 14th November. For more details or to book please visit the That's Crafty website.


I will also be at The Artistic Stamper, near Faversham, Kent, on Saturday 28th November. For more details or to book please visit The Artistic Stamper website or call the shop on 01795 597757.
 

Friday, 3 April 2015

Craft Stamper April blog challenge - DT card

The April Craft Stamper blog challenge starts today on the Craft Stamper blog. The theme of the challenge is 'Take a technique - Colour'.

This is my DT card for the challenge. The stamp I used for the card is Frame Flower 1 by Catherine Scanlon. To colour in the flower petals and leaves I used Color Burst by Ken Oliver Crafts, available from The Artistic Stamper.


To make the card I started by stamping the Flower Frame stamp with a VersaMark ink pad onto white card and heat embossing with WOW Bright Opaque White embossing powder.
 

To colour in the leaves andpetals in the image I used Violet, Alzarin Crimson and Pthalo Green Color Burst. To use this I added a very small amount of the Color Burst powder to a paint tray and added a couple of spritz of water. Once mixed together a watercolour is formed which is ideal of painting, as shown below.
 

For the blue background and centre of the flowers I used Distress Ink pads also as a watercolour.

Once the image was dry I used a Tim Holtz Design ruler as a guide to punch holes down the edge of the image, as shown below. I then sewed black thread through the holes with a needle. I sewed each edge separately and left the ends of the thread loose on the front of the image.
 

I stamped the Flower Frame stamp onto a card blank, as shown below, with black Memento ink pad. I then attached the painted image to the card blank.
 

For more details about to challenge, to enter or see my DT cards please visit the Craft Stamper Blog. 

Thursday, 23 October 2014

Workshop dates

A couple of dates for your diary for new workshops at The Artistic Stamper.


Friday, 3 October 2014

Take It Make It challenge October: DT card

The October 'Take It Make It challenge' starts today on the Craft Stamper blog. The theme of the challenge is the Multicoloured stamping technique. This is my DT card for the challenge. The stamp set I used for the card is Leaves from The Artistic Stamper.  Both the leaves and sentiment are part of the same stamp set.


To create this card I started by stamping the leaves. Instead of stamping various coloured ink pads onto the stamps, I stamped the ink pads onto a clear tile, as shown below. I used Rusty Hinge, Walnut Stain, Frayed Burlap and Forest Moss Distress Ink pads. I used a dry paintbrush to lightly mix the joins between the colours.


I then stamped the rubber leaves stamps onto the inks, I tried to get a mix of colours on each stamp and then stamped onto smooth white card. I cut the leaves out. I stamped more than I used so I had a selection to choose from as every leaf looked different.


For the centre panel on the card I cut a strip of smooth white card. I stamped the sentiment from the Leaves stamp set with a VersaMark ink pad and then heat embossed it with Opaque Bright White embossing powder. I lightly distress the edges with Walnut Stain and Frayed Burlap ink pads before stamping the leaves. I used the same tile technique but I used Old Paper and Antique Linen Distress ink pads for the leaves stamps.

I attached the leaf stamped background panel onto a Elegance 148x148mm card blank from Craftwork card. Lastly I added the leaves to the card. I attached some of the leaves directly onto the card and other with foam pads.


For more details about the challenge or to enter, visit the Craft Stamper blog.

Tuesday, 9 September 2014

New workshop date


My next workshop at The Artistic Stamper, near Faversham in Kent is on Thursday 16th October. I am thrilled that we will be using my Designs by Georgina range of stamps to make a selection of tags using various techniques.

For more details or to book please call the shop on 01795 597757 or visit The Artistic Stamper website.


My range of stamps are also available to buy from The Artistic Stamper. 

Monday, 11 August 2014

Date for your diary

 It's The Artistic Stamper shop birthday on Saturday 23rd August. I will be there with a free Make 'n' Take. Why not pop along for a craft day out. More details on The Artistic Stamper website and the poster below. Hope to see you there!

Friday, 8 August 2014

Florence's Flowers

Today I have a decorated frame to share with you. I use two recently released stamps from The Artistic Stamper for my projects. The two flower pot stamp are designed by Debbie Cotton. They are Florence's Flowers large and Florence's Flowers small.


To make this project I started by painting a wooden frame with PaperArtsy Tinned Peas Fresco Finish paint. The frame I used was 15x15cm collage frame also available from The Artistic Stamper. Once dry I started added the stamped and coloured images.

I cut a square frame of white card to go around the edge of the frame. I stamped just the flowers onto the frame. I also stamped a large and two small flower pots. I used Distress Ink pads and Distress Pens to colour the flowers. To use the Ink pads I stamped the pad directly onto a tile. I added a little water so the ink could be used as a watercolour.
 

I stamped the flowers pot only onto dark grey textured card. For the smaller pots I didn't ink the text on the stamp so I just had the put outline. I cut out the pots and added them to the coloured flowers.

I cut a square of white card for the background. I coloured the card with Tumbled Glass and Stormy Sky Distress Ink pad. I added this to the frame and drew black faux stitching around the edge. I added the centre flower pot directly on the frame. The other two pots I added with foam pads. To finish I added Glossy Accents to the centre of the flowers and a black pearl to the top right corner.
 

Tuesday, 8 July 2014

Cupcake Blueprint

I have a 30th Birthday card to share with you today. I used Tim Holtz Birthday Blueprint stamp set for the main cupcake image. It's a great celebration stamp set and ideal for men and women, as well as all ages. The number and sentiment stamps are both from The Artistic Stamper.


To make this card I started by stamping the cupcake image onto light blue card and smooth white card with a Tuxedo Black Memento ink pad. I cut out the light blue stamped image and mounted it onto a piece of mid-blue card. I coloured the image that was on the white card with Copics. I cut the elements out and attached them to the other image with foam pads.
 

I cut a piece from the front of the card blank, as shown below. Down the edge of the inside of the card blank I stamped Happy Birthday. I used Katy Leitch's Greetings stamp set available from The Artistic Stamper. The 30 panel on the front I used another Katy Leitch's stamp set called Numerical plate  for the numbers.
 

I attached the cupcake image to the front of the card with foam pads. I also added a picture frame corner to the top left corner. I drew faux stitching around the edge with a white gel pen. To finish the card I added Stickles to the flame and Glossy Accents to the little Birthday tab.
 

Friday, 4 July 2014

Craft Stamper Take It Make It Challenge: July

The July blog challenge starts today on The Craft Stamper blog. The theme of the challenge is the Embossing Resist technique.

This is my DT card for the challenge.


To create my card I started by stamping the butterflies and sentiment with a VersaMark ink pad. The stamp sets I used were Flutterby by Katy Leitch and Journaling Words #1 both available from The Artistic Stamper. I then heat embossed the stamped images with a clear embossing powder, as shown below.
 

I then added different colours using Distress Ink pads and a blending tool.
 

The ink pads I used were  Mustard Seed, Picked Raspberry, Peacock Feathers and Shaded Lilac.
 

I then stencilled flowers onto the image using a Walnut Stain Distress ink pad and a piece of blending foam. The stencil I used was PaperArtsy Stencil 005 by Lin Brown. I also stencilled more flowers using PaperArtsy Stencil 004 by Lin Brown and Brayed Burlap ink pad.
 

I distressed the edges of the images with a paper distressing tool. I attached the image to a square of brown card and added small silver brads in the corners before adding to a square card blank.
 

For more details about the challenge or to enter pop over to The Craft Stamper blog. 

Saturday, 28 June 2014

I made this!

This is my tag for the The Artistic Stamper Creative Team blog challenge for June. The theme of the challenge is 'Colour it red'.


To make this tag I started my creative the background. To do this I used my Gelli Plate, PaperArtsy Claret Fresco Finish paint and a rubber texture comb. I spread the paint onto the Gelli Plate and then added the lines with the rubber comb. I then took a print from the Gelli Plate directly onto the tag, as shown below.
 

Once the background was dry I added the other textures and stamping. To start I added the white chevrons. To do this I used The Artistic Stamper's 6x6 Chevron mask and PaperArtysy Snowflake Fresco Finish paint. Once this was dry I stamped Random Dot Background and Calligraphic Mat 11 stamps with a Jet Black Archival ink pad randomly onto the tag.


I then added some of the Claret paint to some Grunge Paint. I added this to the tag through Tim Holtz's Burlap stencil. I stamped the wording in Aged Mahogany Distress Ink onto white card. The wording is from Messy Art stamp set. I tore the edges of the wording card and then added it to the tag. I sewed a row of stitching with red thread down the edge of the wording.


I cut two flowers shapes using Tim Holtz Tattered Floral die. The larger flower I stamped the Calligraphic Mat stamp onto and the other flower I embossed with a Cuttlebug folder. Both flowers I coloured with Aged Mahogany Distress Ink. I attached these to the tag. To finish I added a button and ribbon.

Friday, 6 June 2014

Craft Stamper - Take It Make It challenge

The June Take It Make It challenge starts today on the Craft Stamper blog. The theme of the challenge is 'Bleach Blocking Technique'.

This is my Design Team card for the challenge. I used Journaling Words #1 and Neil Walker's Butterfly and Alphabet Soup Border stamps. All the stamps are available from The Artistic Stamper. 


To make my card I started by blending Mustard Seed, Dried Marigold and Barn Door Distress Inks onto a 14x14cm square of smooth white card.


I then took a clean wet blending pad and pressed onto on the coloured card. It removed the colour as shown below.
 

I repeated the same process but using Walnut Stain and Rusty Hinge Distress Inks.
 

Once dry I stamped the Butterfly twice with a VersaMark ink pad. I then heat embossed it with WOW Ebony black embossing powder. I then cut out the two butterflies.
 

Once the main background was dry I stamp 'Imagine' from the Journaling Words #1 set in the top left corner, and Alphabet Soup Border stamp several times along the bottom. I used a Jet Black Archival ink pad.  I then attached this to a 14.8x14.8cm black square card blank.
 

I attached the two butterflies to the card. I only stuck the body sections to the card so this allowed the wings to stand out. To finish I added a black button and black dots around the edge with a fineliner.
 

For more details about this month's challenge, to enter or see the other DT's challenge cards then pop over to the Craft Stamper blog.

Monday, 2 June 2014

The Gentlemen

Still time to book for my 'The Gentlemen' workshop this Saturday, 7th June, at The Artistic Stamper, near Faversham, Kent. The workshop is from 2-5pm for only £15! We will be create a card, tag and gift wrap and other items for The Gentlemen in your life using recently launched stamps from The Artistic Stamper range.

For more details or to book call the shop on 01795 597757 or visit the website.

Friday, 16 May 2014

My June workshop

My June workshops at The Artistic Stamper, near Faversham, Kent, will be on Saturday 7th June. The morning workshop is 'The Ladies' from 10am-1pm. The afternoon workshop is 'The Gentlemen'.

We will be creating a card, tag, gift wrap and other items for the Ladies / Gentlemen in your life. We will be using recently launched stamps from The Artistic Stamper.


For more details or to book please visit The Artistic Stamper website or call the shop on 01795 597757.

Monday, 12 May 2014

My June workshop

My next workshops at The Artistic Stamper, near Faversham, Kent, will be on Saturday 7th June. The morning workshop is 'The Ladies' from 10am-1pm. The afternoon workshop is 'The Gentlemen'.

We will be creating a card, tag, gift wrap and other items for the Ladies / Gentlemen in your life. We will be using recently launched stamps from The Artistic Stamper.


For more details for to book please visit The Artistic Stamper website or call the shop on 01795 597757.

Wednesday, 30 April 2014

My May workshop

Just a little reminder about my May workshop at The Artistic Stamper, near Faversham, Kent. The workshop is on Saturday 10th May from 10am-3pm.

We will be making at least EIGHT cards for all different occasions. Yes that's right at least EIGHT cards! A little sneaky peek of the cards below.

For more details or to book call the shop on 01795 597757 or visit The Artistic Stamper website.

Tuesday, 15 April 2014

FREE Make 'n' Take this Saturday

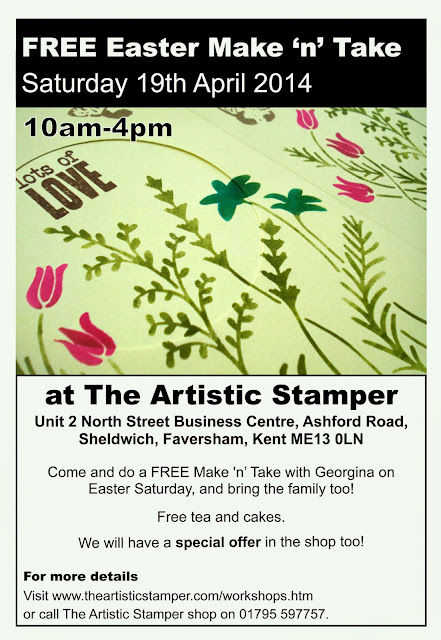
Just a reminder about my FREE Make 'n' Take at The Artistic Stamper this Easter Saturday, 19th April. There will also be a special offer in the shop too on the day. More details on the poster below or on The Artistic Stamper website.

Monday, 7 April 2014

My May workshop

 'Let's Make Cards!' is my May workshop at  The Artistic Stamper near Faversham, Kent on Saturday 10th May from 10am-3pm. We will be making at least 8 cards for all different occasions.

For more details or to book call the shop on 01795 597757 or visit The Artistic Stamper website.

Friday, 4 April 2014

Craft Stamper blog challenge

A new 'Take It Make It' blog challenge has started today on the Craft Stamper magazine blog. The theme for April's challenge is Bottles.

This is my DT card for the challenge. The stamp set I used for the flowers and sentiment is Floral Sketch from Hobby Art. The chipboard jar is from The Artistic Stamper.


To make this card I stamped by stamping the flowers onto thick white card. I used Mustard Seed, Aged Mahoney, Barn Door, Fired Brick and Tattered Rose Distress Ink pads. I also used the same inks pads to colour-in the flowers. To do this I stamped the ink pads onto an acrylic block and added a little water. I then used the ink as a paint. I then cut out each flower.


I coloured a chipboard jar with Frayed Burlap Distress Paint. I added a darker edge with Frayed Burlap and Walnut Stain Distress ink pad. Once dry I added some details with a pencil. The chipboard jar is from The Artistic Stamper. I stamped the sentiment from the Floral Sketch stamp set onto white card. I cut out the sentiment into a tag shape. I added the tag to the jar with red ribbon.


I attached a torn-edge panel of white card to a DL kraft card blank. I added black dots around the edge with a fineliner. I added the jar to the card. I used a Forest Moss Distress marker to draw in the flower stems. I added the flowers with foam pads. To finish I added brown Cosmic Shimmer PVA to the centre of the flowers.