Sunday, 31 January 2010
Passion for ProMarker - week 36 challenge
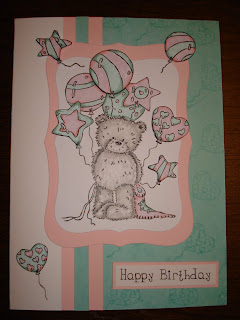
This is my challenge card for Passion for ProMarker week 36 challenge. http://promarkerchallenge.blogspot.com/
This is the first time I've entered a blog challenge. I really liked the colour combination of pastel green and blossom for this weeks challenge so I thought I'd give it a try! I don't need much of an excuse to make a card.
The bear stamp is by Crafter's Companion. It's Popcorn the Bear, Smile set of stamps. The image was stamped using Memento ink pad. The balloons and the blanket were coloured in using this weeks' colours of pastel green and blossom. The bear was coloured in using ProMarkers cool grey numbers 1, 2, 3 and 4.
The frame for the bear was cut out using Nestabilities Labels 8. The green background panel was stamped with one of the single balloon image stamps. I used VersaMark ink pad as it gives a very subtle image. I stamped out a few of the balloons from the main image and coloured them in. I added these to the card with 1mm foam pads.
I hope everyone like my challenge card. I do!
Wednesday, 27 January 2010
Bbq birthday card
It's certainly not bbq weather today but this is a card I made for my uncles birthday that is today. Happy Birthday! He's a top bbq'er so this stamp my Panduro was ideal. It was stamped with Memento ink and coloured in with ProMarkers. I used Nestabilities to cut out the shape and the background. The embossed edge was created with Cuttlebug embossing folders. The card candy was from Craftwork Cards.
Labels:
Craftwork Cards,
Nestabilities,
Panduro,
ProMarkers
Sunday, 24 January 2010
Happy cupcake birthday
A 30th birthday card for a lady who loves her cupcakes and pink! The background paper was actually a magazine freedie which I've actually used for once rather than adding to a pile of unused magazine papers. The card is Chocolate Chip and the pink card is Regal Rose both from Stampin' Up. The texture on the cake case and cream topping were added using Cuttlebug embossing folders. The 'sprinkles' were spots of stickles. I added buttons with PVA glue. The thread through the button is Linen Thread from Stampin' Up. The greeting and boarder were cut using Nestabilities.
Thursday, 21 January 2010
Cards for football fans
The little football chap stamp on this card is by Panduro. It was stamped using Memento ink and coloured in using ProMarkers. It was cut out using Nestabilities. The net background paper is by Kanban. The football outline was stamped on the card. This stamp was also part of the Panduro set. I stamped and coloured in another head and hat which I attached to the card with foam pads. The circle greeting is by Craftwork Cards.
This stamp was by Sugar Nellie. It's called Football Luca. Again it was coloured in using ProMarkers. The circle greeting is by Craftwork Cards.
Tuesday, 19 January 2010
Trendy Trees
This card was made with one of my new Stampin'Up sets, 'Trendy Trees'. The trunks were stamped first with VersaColour and Memento brown inks. The leaf tops were added after in various VersaColour green inks. I used a Stamp-a-ma-jig to line them up with the trunks. Two of the leaf tops were stamped on another piece of card and cut out with a circular punch. The two tops were added using foam pads.
I attached a piece of green ribbon along the bottom of the trees to look like grass. I stamped a greeting using brown Memento ink.
Sunday, 17 January 2010
New crafty goodies!
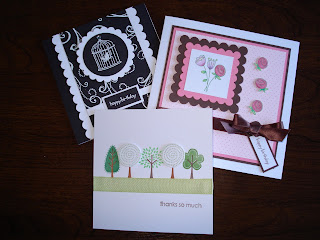
The end of last week saw the arrival of my new Stampin'Up goodies. It was like Christmas all over again. So Saturday just had to be set aside to getting crafty and these three cards (above) were the result. They were made using Happy Moments (sale-a-bration promotional set) and Funky Trees stamp sets.
This card was made using the bird and greeting stamp from the Happy Moments set and the swirl from Seasons of Joy set. I stamped the bird, greeting and swirls onto black card using VersaMark and then heat embossed then using white embossing power. The bird circle and scalloped circle were cut out using Nestabilites. The scallop edges were cut using Scallop Edge Punch. The edges were stuck onto black card using double sided tape. The swirl pattern rectangle an greeting were mounted on top. The circle was attached with foam pads to add dimension. A small crystal gem was added to the top of the bird cage.
This card was also made using the Happy Moments stamp set. The flowers and rose heads were stamped with green Memento ink pad onto super smooth white paper and coloured in with ProMarkers and metallic colouring pencils. The flowers design was mounted onto Regal Rose and Chocolate Chip scalloped squares, cut again with Nestabilities. On a large square of Chocolate Chip, a square of Regal Rose and spotted Always Sweet pink paper was stuck with double sided tape. I made a greeting tag with the Happy Moments stamp and Chocolate Chip card. I added ribbon across the square and a bow. I attached the bow with PVA glue. I cut the small rose heads out and attached the with 1mm foam pads.
Thursday, 14 January 2010
Twit Twoo
Owl designs seem to be everywhere at the moment. So to keep up with card trends here's my owl card. This card is for my dad's birthday which is on Sunday.
The usually tricky task of a card for a man was made all the easier with this stamp. The stamp is my Dawn Bibby. The owl, branch and leaf design came as part of a set which I got for Christmas. Christmas has certainly increased my craft stash!
I used dark green for the card which I then cut a label shape out of the front using Nestabilities. I stuck acetate on the left hand inside of the card and blue paper on the other side. The owl design was stamped onto dark and light brown card using brown Memento ink pad. I used Sakura pens to add detail. The branch and owl were stuck on the front acetate panel using double sided tape. I stamped another owl and branch so I could stick them on the inside of the acetate to cover the double sided tape up. I stamped an cut out some leaves to place around the edge of the card.
I was very pleased with my first owl card and hope my dad likes it too. Twit Twoo!
Tuesday, 12 January 2010
New Home
A couple of friends moving home is just another excuse to make some cards.
The house design was embossed onto paper using a brass stencil. I coloured in the house design using Twinkling H20s. I used a tag shape card to make a change from my usual favourite square cards and to finish off a little piece on gingham ribbon was tied through the top. The brown recycled look for the card gives the card a rustic look. It's looking like gingham ribbon maybe on the list of favourite craft items for 2010. I love to add ribbon onto cards and the gingham pattern makes a change from the normal plain coloured ribbons.
The tree line background was stamped using one of my Christmas presents, Stampin'Up wheel Funky Forest. I was very pleased how the tree line came out. The house, roof, windows and door shape were cut from various coloured papers from a house shape I drew myself. A textured look was added to the grass and roof using VersaMark ink pad and Stampin'Up Sanded stamp. The words were made from letter printed onto paper and then cut into rectangle shapes and stuck on individually. I tied linen thread (which is also probably going to be on my favourite list)round the bottom on the card.
Labels:
gingham ribbon,
linen thread,
new home,
Stampin' up
Saturday, 9 January 2010
Welcome to 2010...
... and welcome to my new blog. I am looking forward to sharing my cards, craft though, finds and my new purchases with you.
I mostly using rubber stamps for my cards. After many years of resisting buying rubber stamps I finally succumb to them just over a year ago. And now Im hooked. My first cards of the year have been Thank You cards for my birthday gifts.
This flower design was creating using Stampin'Up It's Beautiful wheel stamp. The flowers were coloured in individually with various Brillance ink pads. Crystal Stickles have added a little bit of sparkle.
This card was creating using Hero Art Thank You stamp. The stamp was a very recent January sale purchase and Ive already put it to good use. The design was coloured in with Pro Markers, which were probably one of my best buys of 2009!
Subscribe to:
Posts (Atom)