Saturday 20 November 2010

Golden season of joy


Sorry I have not added any posts this week but it's been a busy week. Sometimes there's just not enough hours in the day! I have finally started making a Christmas cards order I had from a friend and also had some cards to make for Little Claire using four new sets of stamps coming out in December. As usual they are lovely designs.

Today's card is one of selection of cards I have made for a friend. The stamp set I used is 'Season of joy' by Stampin' Up.


I begun my stamping the tree and greeting with clear VersaMark ink pad and heating embossing it with WOW gold embossing powder. I mounted this onto a panel of gold card. I stamped a panel of the cream paper with the snowflake design. I used gold Brilliance ink pad to stamp the design. I also stamped just one snowflake. I cut this and a gold scalloped card circles with Nestabilities.


I punched the edge of panel of plain cream card with a scalloped edge punch. I attached the two cream panel together. Across this panel I added a strip of gold ribbon. The snowflake circle was added to the card with brad.

I covered a card blank with gold card. Onto this I added the cream panel. To finish I added gold dot to the scallop edge with a gold Sakura pen.
Sunday 14 November 2010

Festive crafting


These are four Christmas cards I made yesterday at a DoCrafts crafting get-together arranged by the lovely Lisa. It was a fun afternoon and looks forward to another craft afternoon (or day) next year. I had made sample cards for Little Claire but until yesterday I hadn't started making my own christmas cards, whoops!


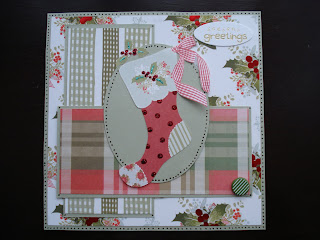
My first card (above) was a sketch challenge set by Sandra (bashnee). The card was made using 'Classic Christmas' range of papers by Papermania. The oval greeting is my Craftwork Cards. To finish the card I added green and red Stickles.


For my second card I used Stampin' Up 'Medallion' stamp for the main image. It was heating embossed using WOW silver bells embossing powder. The circle was cut out using the large circle cutting die from Little Claire. I added small silver dots around the edge of the stamped image circle with a silver Sakura pen. The circle greeting is by Craftwork Cards.


My third card used Stampin' Up 'Dasher' stamp for the main image and the greeting is from 'Seasons of Joy' set. Again it was heating embossed using WOW silver bells embossing powder. The layers were cut using Nestabilities. I added small silver dots with a silver Sakura pen and black brads.


My final card used a tree from Stampin' Up 'Seasons of Joy' stamp set. Again it was heating embossed using WOW silver bells embossing powder. I used layers of silver, black and green card. I used green ribbon to match the green card panel to finish.

Monday 8 November 2010

Clare's weekly challenge - inspiration


This is my card for Clare's weekly challenge on the DoCrafts website. The challenge this week was inspiration, so from the photo I used the colours - shades of brown - as my inspiration.


The squirrel decoupage image and backing paper are both from DoCrafts new 'Woodland Folk' range. I saw Clare at the DoCrafts demonstration at The Glitter Pot last Saturday using these products. It is such a lovely range that I had to have it!

I began by putting the decoupage image together using foam pads. I mounted this onto a square of brown card. I also cut a large square of brown card for the main background. Onto this I attached a square of acorn pattern paper.


I added four corner strip of dark cream ribbon to the card. Onto one of the ribbons I threaded a button. Once the panel was added to the card blank I added white stitching with a white Papermania pen. To finish I added a greeting from the Woodland Folk range.

Studio Sketches


This is a birthday card I made for my Uncle. The two stamp set I used are 'Studio Sketches' and 'En Francais' both by Stampin' Up. The Studio Sketches set was a Hostess Set I earned for hosting a Stampin' Up party.


I begun by stamping the sketches images on cream card using sepia VersaFine ink pad. I cut out all the images and mounted them on dark brown card. The script background panel was stamped using the En Francais stamp. This makes a lovely background pattern. I distressed all the edges with a sponge dauper and the sepia ink pad.


I covered a square card blank with dark brown card. Onto this I added a cream panel and the stamped script panels. The sketches were added with foam pads. To finish I added a circle greeting from Craftwork Cards and some gold Papermania Dew Drops.

Saturday 6 November 2010

Mr & Mrs


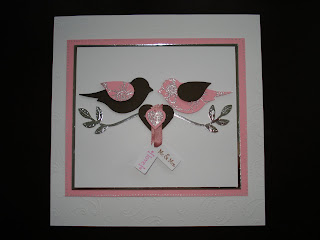
This is a wedding card I have made. I used one of my favourite punches for the card,the Stampin' Up 'Two part bird punch'. I kept to a simple colour scheme of pink, brown and silver.

I begun by stamping a piece of pink card with Camellia & Camellia Border stamp. I used a clear VersaMark ink pad and heat embossed it with silver WOW embossing powder.


I punched out the bird and wing from the embossed pink and brown card. I punched two branches out of silver card. The bird image was layered up on white card with either doubled sided tape or foam pads. The tags were stamped with Stampin' Up 'Tiny tags' stamp set. I used the tag punch to punched these out. The tags were threaded onto pink ribbon. I used hearts and pva glue to attached them to the card.


I covered a square card blank with embossed card by Craftwork cards. I layered the image panel onto silver and then pink card. I added silver dots with a silver Sakura pen. This was then added to the card blank.

Wednesday 3 November 2010

Little Claire - November Stamp Club set


These are two card I have made using Little Claire's November Stamp Club set. This is lovely stamp which would be ideal for Christmas cards and also winter birthdays.


Both the stamped images were stamped with Memento ink pad and coloured in with ProMarkers. I used Nestabilities to cut out the image and the frame.

For the first card I added a distressed look to the card with a sponge dauber and VersaFine sepia ink pad. To finish the card I added buttons and threaded pink ribbon through the patterned paper.

For my second card I added small flowers around the image. These were cut from another sheet of paper the same as the background paper. I also added small white dots around the frame with a white Sakura pen.

Tuesday 2 November 2010

Creativity! Talent Spot

Have you seen the latest edition of DoCrafts Creativity! magazine? If you have you might have seem by cards in Clare Curd's Talent Spot section on page 60.

Clare contacted me a couple of months ago to ask if I would be in the Talent Spot section and of course I agreed! I was so thrilled to be asked. A few weeks later I was sent all these Christmas goodies to make my three cards with.


These are the three card I made using the items.

The first card using red and green as the main colours. The card blank was covered in holly patterned paper. The tree image is pyramage. The ribbon was perfect colour match. I added brads and red dew drops to finish the card.


My second card is simple design and colour scheme. The letters were individually stuck on. To finish I added gems around the red frame.


For my final card I wanted to use a non-traditional Christmas colours so I chose pink and black. I added gems to the snowflakes for extra sparkle.