Thursday 29 April 2010

Stamp With Us challenge card


This is my card for the Stamp With Us challenge blog, http://stampwithus.blogspot.com/ The theme of the challenge is Birthday. For this challenge I made a 30th birthday card. As this is a special birthday I also made a box for the card.


The card base was made from a sheet of A4 Night of Navy card. I cut the card in half lenghtways and then I scored it in half to form an A6 card. I used a 3 and 0 templates to draw the numbers on the front of the card. I cut around the outline to form the 30. I used a gold Sakura pen to draw in the dots.

I used the Fun & Fast Notes set of stamps by Stampin' Up for the cake and stars. I used a Memento ink pad to stamp the images and coloured them in with ProMarkers. I finished them with a gold Sakura pen and Glossy Accents. I attached these to the front of the card with double sided tape.


I also used the cake stamp for the inside of the card. I cut an A6 panel of Brocade Blue card. I used the white Kraft ink pad to stamp the cake image. I attached this to the inside of the card.

I used Brocade Blue card for the greeting panel on the back of the card.


I made a box to go with the card. The box was made from Brocade Blue card. I cut the scalloped edge with the Stampin' Up punch. I added ribbon and a greeting. The greeting is by Craftwork Cards.

Stampin' Up products used:
Stamps - Fun & Fast notes
Ink - White Kraft
Card - Night of Navy and Brocade Blue
Other - Scalloped edge punch
Tuesday 27 April 2010

Lili of the Valley cards

These are a couple of card I've made using Lili of the Valley stamps. They have a lovely range of stamps which makes card making that little bit easier and fun!

My first Lili of the valley card was create for Clare's weekly challenge on the DoCrafts website, www.docrafts.co.uk. This weeks challenge was a sketch challenge.


The image is one of Lili of the Valley fairy stamps. I used a Memento ink pad to stamp the image and coloured her in with ProMarkers. I cut out the circle with Nestabilities. I stamped the wings twice so I could add them again over the edge of the circle. To added sparkle I drew round the wings with a gold Sakura pen.


The purple panel was embossed using a Cuttlebug embossing folder. I added a strip of ribbon to use using double sided tape. The wording stamp is from Simply Said stamp set by Stampin' Up. I also used one of the flowers from the same set to stamp the background of the card blank. I used Stampin' Up white kraft ink pad.

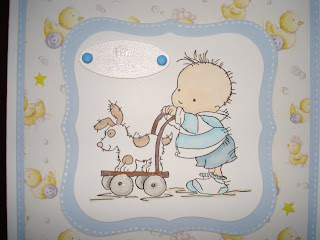
The second card is new baby card. I using the little baby boy stamp.


I used a Memento ink pad to stamp the image and coloured him in with ProMarkers. I added Glossy Accents to the wheels. I cut the stamped image and the frame out with Nestabilities. I cut a large square of the same blue card for the background panel. On the panel I attached a square of duck paper. This paper is by Forever Friends.

Before adding the stamped image and frame to the background panels, I added a New Baby greeting with blue brads.


To finish I added white stitching with a white Sakura pen.

Sunday 25 April 2010

Tilda with a citrus twist


This is the card I've made for this fortnight Tilda challenge on the DoCrafts website, www.docrafts.co.uk

The theme of the challenge was to use citrus colours, so as you can see I used lemon yellow, lime green and orange for the tall flowers and also for the flowers in Tildas hair.


The stamps I used for this card are the spring Magnolia Stamp Club set. They only arrived a couple of days ago and I couldn't wait to use them. I used a Memento ink pad to stamp the images and they were coloured in using ProMarkers. I used masking on Tildas right hand so I could get the tall flower to appear like it's behind her. The coloured image was cut out and mounted into a square of gold card.


For the background I chose a colourful flowery paper. Although it's highly patterned, its colours are quite pastel so it doesn't detract from Tilda. I also added a scalloped punched strip of pale yellow paper. I used my Stampin' Up scalloped punch for the edge.

When I stamped the main image I also stamped three additional butterflies and also a mini Tilda. These were also part of the spring stamp set. I coloured this in with ProMarkers and attached them with double sided tape. The mini Tilda is so cute. I just had to use her.

Saturday 24 April 2010

Come and join in !

Good afternoon everyone. Just to let you know I'm hosting this fortnights Penny Black challenge on the DoCraft Challenge forum, www.docrafts.co.uk . So if you're a DoCraft member or fancy joining up, then load a card up in your gallery and join my challenge. I've not hosted a challenge before so it could be interesting.


For the challenge I decided the theme was going to be shaped cards. I mostly make square cards. I like the square shape and my design ideas usually work well with a square card. I've made a card for the challenge myself (above). For the card blank I used Elegant Rectangles by Craftwork Cards.


I started by stamping out all the element I required. The stamp set I used was called 'Wonderful Day' by Penny Black of course. I was planning to decoupage the little hedgehog so I stamped this three times. I used a Memento ink pads as I coloured with elements with ProMarkers. I cut out all the pieces around the edge except the hedgehog which I cut leaving a long strip.


I also cut a long strip of dark green card. Using my Martha Stewart flower edge punch I punched two strips of white paper. Making sure these were both longer than the card blank. I attached the white strips to the back of the green strip. On the front of the green strip I attached the hedgehog strip.


To make the card blank I scored a line 2.5cm from the edge of one of the Elegant Rectangles. I used double sided tape to attach the two rectangles together. I then attached all the little bugs and flowers to the card using either double sided tape or a Quickie Glue pen. I drew in the legs etc of the bugs with a Letraset fineliner.


From the original stamped image sheet I cut of the daisy twice. I attached the flowers with foam pads. To finish I added Glossy Accents to the centre of the flowers and I drew round the daisy with a golden Sakura pen.

Thursday 22 April 2010

Passion for ProMarkers - week 48 challenge


This is my card for this Passion for ProMarkers challenge.
http://promarkerchallenge.blogspot.com/

The theme of this weeks challenge was 'In the garden' and what better stamp set to use for this challenge than 'In the garden' set by Little Claire Designs, www.littleclaire.co.uk


I stamped the bird house with memento ink pad. I separately stamped the watering can which was from the same set and also the wellies, which came from 'Rainy days' stamp set also by Little Claire. I coloured these in with ProMarkers. I wanted to add some interest to the main image so I decided to cut it into three pieces. Thought it would be a bit different to the normal rectangle image. I mounted the three sections to Kraft card by Stampin' Up.

Before mounting this panel onto cream card I tied linen thread, also from Stampin' Up around the card. I used this to tie my greeting tag onto. I stamped with greeting with white craft ink pad. I cut out the watering can and attached it to the image.

I decided to make an easel card. The card blank was made from one A4 piece of card. I cut in half long ways. I folded one of these piece in half and then one of the halves panels in half again. To this now quarter panel I attached a A6 piece of card. This was a quarter of the original A4 sheet.


The bottom panel was made from a rectangle of cream card which I punched with a scalloped edge punch by Stampin' Up. I attached a strip of spotty paper by My Minds Eye. To hold the top of the card up I added brads. The cream section was added the the lower section of the card. To finish I added the wellies.

Wednesday 21 April 2010

Penny Black challenge card

Firstly I'd like to say hello to all my new followers! Hello!! Nice to having you along for the ride.

This is a card I made for the Penny Black challenge on the DoCrafts website, www.docrafts.co.uk

The theme of the challenge was to use a new item from your crafty stash and used a colour scheme of black and pink. I had bought a new set of Penny Black stamps at Ally Pally the other week and funny enough I hadn't got round to using them yet (probably because I've too many other new bits) so this was an ideal first use.


The stamp set was called Wonderful Day. I stamped the hedgehog image twice with a Memento ink pad and coloured it in with ProMarkers. I cut one of the coloured in images out with Nestabilities. I also cut a frame out of black card. From the other hedgehog image I cut out the flower head and ladybird and attached it to the first image with foam pads. I added Glossy Accents to the ladybird. I also stamped and coloured in a butterfly and snail from the same stamp set.

I cut a large black square of black card for the main background. Onto this I attached a bright pink and stripped pink paper panels with double side tape. The stripped paper is by Hugs and Honey by Papermania. The centre black strip was punched with Martha Stewart hydrangeas punch. I punched both long edges of a strip of black card.

The flower was a white Prima paper flower which I strayed with Craftynotions pink lustre stray. I'd never done this before and I was very pleased with the result. I've got a couple of sprays that I've not really used but I think that might change.

I attached the flower with a brad and the butterfly and snail with a quickie glue pen.

Tuesday 20 April 2010

Cards for friends

These cards were made for two friends. The pink Tilda card was for my April friendship cards swap on the DoCrafts website, www.docrafts.co.uk. The lilac Tilda card was a postcard I made for a friend who is having an exhibition of handmade postcards.


This is my friendship swap card. The Tilda is Tilda holding lilacs. She was stamped with Memento ink pad and coloured in with ProMarkers. I added highlight with a gold Sakura pen. I created a masking for the Tilda with a post-it-note so I could stamp with flower background. The flower background was stamped with a green Memento ink. The flower stamp is part of a set called Simply Said by Stampin' Up. These flowerheads were again coloured in with ProMarkers.


I mounted with Tilda on a rectangle of magenta card. I used the same colour card for the main background panel and the punched edge. The punched edge was created using Martha Stewart Hydrangeas punch. I punched both sides of a strip of magenta card. I stamped a white panel in pale pink using a flower stamp from the Simply Said set.


The flower heart was also part of the Simply Said stamp set. The hearts were cut out with the new Stampin' Up heart punch. I added stitching with a white Sakura pen.


This postcard with made using the Simply Said stamp set again. The Tilda I used is Tilda with bike. I added a strip of ribbon along the centre of the card. The white flowers were stamped with white Kraft ink pad by Stampin' Up.

Monday 19 April 2010

Passion for ProMarkers - week 47 challenge


This is my card for this weeks Passion for ProMarkers challenge. For this weeks challenge you had to create the background using ProMarkers only.
http://promarkerchallenge.blogspot.com/

My card is very simple this week. I used pale shades of blue, green and orange. The present and greeting are from part of a set of stamps by Stampin' Up called Happy Moments. They were stamped with Memento ink pad and coloured in with ProMarkers. I cut the stamped image out Nestabilities. I also cut a frame with a larger nestie. I coloured the frame with three shades of blue - powder blue, cool aqua and denim blue. I edged the card blank with two of the blue shades. On top of this I attached a plain square and then the stamped image.

Sunday 18 April 2010

Little birds


These are the little cards I've made for Clare's Weekly Challenge on the DoCrafts website, www.docrafts.co.uk

This weeks challenge you had to take inspiration from a photo. The photo was of a hot sandy desert. I used the colours for my inspiration.

The sky was bright blue, I used this colour for the bird. There was a white layer in the sky with I used for the circle background. There were green tips to plants so I used this for the wing and branch. The sand was shades of brown, gold and orange so I used this for the card, scalloped frame and flower. The flower and birds' eye was added with Pearl Dimensions.

The bird punch is by Stampin' Up and is from their new mini catalogue. It's such a pretty little bird. I think it would be suitable for so many occasions. The circles were cut out using Nestabilities.

Saturday 17 April 2010

LOTV challenge card


This is my card for this weeks Lili of the Valley sketch challenge.
http://liliofthevalleythursdaychallenge.blogspot.com/

Since my last post I've reached 1,000 hits on my blog. I was very happy to see my counter go over 1,000. I didn't think that was too bad as I only started blogging this year. Thanks to all my visitors!

Back to my card for today. For the challenge I chose to use another one of my new purchases from Ally Pally last week. The stamp is Thistledown Fairy by Lili of the Valley, www.liliofthevalley.co.uk/

I stamped the whole fairy image twice using Memento ink pad. I also stamped the flowers a few times more as I wanted to use them for the background. I coloured in the fairy and flowers with ProMarkers. I added highlights with Sakura gold and glitter pens. I cut out one of the fairy image and a scalloped frame with Nestabilities. Where the image was cut off I cut out these sections from the second fairy image and attached them to the original fairy image.


I cut a large square of the dark green card. This was the same colour that I used for the scalloped frame. Onto this I mounted a square of white paper. I cut out more of the little flowers and attached these to the white square with double sided tape.


I added a strip of dark pink ribbon across the card and attached it behind the green square. I printed a greeting which I mounted on gold card and then onto the card.

Thursday 15 April 2010

Stamp With Us sketch challenge


This is my card I'm entering into this fortnights Stamp with Us challenge. This time the challenge is a sketch challenge.
http://stampwithus.blogspot.com/

When I first saw the sketch one Stampin' Up set came straight to mind, and that was Trendy Trees. The three square on the sketch would be ideal for the trees and I could use the spotty swirl for the background. This set also has a greeting. I chose to use a colour scheme of browns and greens. Before making the final card I drew out the sketch on a piece of A5 paper so I could make sure I got the measurements correct on the final card.

I scored and folded a piece of dark green A4 card in half for the card blank. I cut a piece of Stampin'Up Kraft card for the background panel. I cut this 1cm small on every edge. I stamped with spotty swirl stamp with watermark VersaMark ink pad. I then heat embossed this with clear embossing powder.

On white card I stamped three tree trunks. Using a Stamp-a-ma-jig I added the tree tops using three different colours of green ink pads. I also stamped the greeting. I cut all the stamped images out following the measurements. The tree squares were mounted onto a panel of green card. I mounted the greeting on a panel of Kraft and also white card.


Before attaching all the panels together I added dark brown brads in each corner. The panel were then attached to the card blank using double sided tape.

Stampin' Up products use
Stamp set: Trendy Trees
Card: Kraft
Other: Stamp-a-ma-jig

Monday 12 April 2010

On your Christening - Challenge card


This is the card I'm entering into this weeks Clare's Weekly Challenge on the DoCrafts website, www.docrafts.co.uk. This week it was a sketch challenge.

For this card I used one of my new Lili of the Valley stamps which I bought at Alexandra Palace craft fair at the weekend. The Lili of the Valley stand was the first place I visited as I 'needed' to get some of their new stamps. I've bought quite a few so I'm sure you'll be seeing them all over the next few weeks.

I stamped the little boy image with a Memento ink pad and coloured him in with ProMarkers. I cut out the stamped image and scalloped frame with Nestabilities. I also cut a large background panel and strip from the same blue I used for the scalloped frame. I used blue gingham paper for the background.


I mounted all the layers together, and before attaching them to a card blank I added white buttons and two star brads. The greeting was printed out and mounted on blue card.

Sunday 11 April 2010

Passion for ProMarkers - week 46 challenge


This is my card for this weeks Passion for ProMarkers challenge. http://promarkerchallenge.blogspot.com/

This theme of the challenge is 'The Young Ones', so it was a card for the young ones in iur lives. My card is for a little girl so I've kept the colours soft and girly.

The stamp I used is called Lazy Ellie by Stamposaurus, www.stamposaurus.co.uk. It was stamped with Memento ink and coloured in, of course, with ProMarkers. I added Glossy Accents to the daisy centre and the ladybird and Stickles to the leaf centres and heart. I cut the stamped image and background frame out with Nestabilities. The white flower outline was cut out using a Cuttlebug die.


I chose lilac as my main colour so I used this for the main background panel. The spotty background and the strip are Whitewashed Core'dinations papers. The spotty panel was created with the Swiss Dot Cuttlebug embossing folder. After embossing I lightly sanded the paper. The strip was torn from the sheet to expose the coloured core colour.

To finish I added an oval greeting by Craftwork Cards, ribbon and brads.

Friday 9 April 2010

Tractor birthday card


This is an easel card I've made using one of my new stamps. The stamp is called Tractor by Stamposaurus, www.stamposaurus.co.uk

I usually make square cards but I thought for a change I'd make an easel card. I made the card base by cutting an A4 piece of card in half longways. One half I scored and folded in half to form a card. I then scored and folded one of the half panels of the card in half again. The other half from the original A4 piece I cut in half to get an A6 piece. I then attached this A6 piece to the bottom part of the panel of the card. To make sure the card stood up I attached, with small foam pads, a row of Craftwork Card's silver card candy.

The Tractor stamp was stamped with Memento ink pad and coloured in with ProMarkers. I stamped the image again. I coloured and cut out the tractors wheels and the farmers hat. I added these to the original stamped image with foam pads. I added Glossy Accents to the wheels. The stamped image and a frame were cut out using Nestabilities.


I used mostly green shades for my card. I chose to use a green spotty paper for the background. The patterned strips were cut using Fiskers bat wing scissors. The oval birthday greeting is by Craftwork Cards.

Wednesday 7 April 2010

Stamp With Us Colour Challenge


This is my card for the Stamp With Us blog Colour Challenge. http://stampwithus.blogspot.com/

The inspiration photo was a field of pink and orange tulips. I chose to use a flower stamp and orange and pink as my main colours.

The flower stamp is from Stampin' Up Happy Moments stamp set. I stamped it four times onto white coated card using a Memento ink pad. The flowers were then coloured in using ProMarkers. I mounted the stamped strip onto a rectangle of Regal Rose card. Along one of the long edges I had punched a scalloped edge using Stampin' Up Scallop Edge punch. I attached a strip of Certainly Celery ribbon. With the same ribbon I made a flat bow with I attached the the ribbon strip with double sided tape. This was attached to a square card blank.


I added a thin strip of Pumpkin Pie card to the card blank. To finish the card I stamped a birthday greeting using the happy birthday stamp from the Happy Moments stamp set.

Stampin' Up products used
Card: Regal Rose and Pumpkin Pie
Stamp set: Happy Moments
Ribbon: Certainly Celery
Other: Scallop Edge punch

Monday 5 April 2010

DoCrafts challenge cards


These are two challenge cards I've made for the Sunday Stamping Challenge (SSC)and Clare's Weekly Challenge on the DoCrafts website www.docrafts.co.uk. Both cards use stamps by Little Claire Designs (www.littleclaire.co.uk/).


My first cards is for the Sunday Stamping Challenge (SSC). The theme of the challenge was to make a card with a matching bookmark but you had to use the same stamp on both. As you can see from the photo below the bookmark and the pink panels use the same stamp. The stamp I used was Camellia by Little Claire Designs. The pink panels were stamped with VersaMark ink pad and heat embossed with white embossing powder. The bookmark was stamped with Memento ink pad and coloured in with ProMarkers.


The card blank was created from one piece of A4 card which I folded to 1/3 A4 and I cut away a diagonal panel. This create a 'Concertina' card. On three of the panels I attached a pink embossed flower panel which was mounted into a piece of white paper. On the inside panel I punched a strip of the green card with the Martha Stewart flower punch. This was attached to the card to create a holder for the bookmark.


The bookmark was create from a strip of green card which I attached a flower strip which was stamped and then coloured in with ProMarkers. I added a tassel through a hole in the green card.


The greeting on the front was create from two circles which were cut with Nestabilities. The flower edge is Camellia boarder stamp also by Little Claire Designs. This was again coloured in with ProMarkers.

My second card is for Clare's Weekly Challenge. The inspiration photo for this challenge was an old fashioned telephone box in the snow. I used the bold colours of the red and white as my inspiration for this card.


The flower stamp is PomPom Dahlia by Little Claire Designs. It was stamped with Memento ink pad and coloured in with ProMarkers. I also used the same stamp to create a patterned background panel. I just stamped the head of the flower using scarlet Versacolour ink pad.


I used layers of red and white paper for the card. To finish I added red ribbon and a bow. The greeting was a Stampin'Up greeting stamp which I stamped in red ink on a small tag.

Sunday 4 April 2010

Happy Easter


Sometimes chocolate eggs aren't for everyone so I've made this pretty card as an alternative and it's certainly low calorie! I chose to use yellow as my main colour, as to me it's the colour of spring. The card is quite simple as I wanted the flowers to be the main focus.

This card uses two new products from DoCrafts, the Papermania rosette template and X-Cut punch. I saw these being used at recent craft demos and I just had to have them as I could see a lot of uses for them.

I cut rectangles of white and yellow paper which I mounted on top of each other. The greeting was text I printed out. On the first white layer I cut the corners with the new X-Cut fleur corner punch and emboss punch. The curve shape it cuts allows you to tuck the corners in of the next layer. I added a small dot of stickles in the centre of the embossed flower which the punch also produced. I added stitching with a white and green Sakura pens. The card blank is my Craftwork Cards.


The daisy flowerheads were made using the Papermania rosette template. The template creates a large rosette but I wanted to use the template to create a smaller daisies. I drew around the template onto a piece of white paper. I reduced this on a photocopied to three different sizes which I then cut out and stuck together using the instructions on the template. I cut the centre yellows circles with Nestabilities and added texture with a Cuttlebug embossing folder. To finish I added crystal Stickles to the yellow centres.

Happy Easter everyone.