Tuesday 31 August 2010

The Stamp Man Challenge 4


This is my card for The Stamp Man challenge 4. The theme of the challenge was 'musical'. I thought the ideal set of stamps to use for parts of this card was Aspects of Design 60 Classical Instruments by The Stamp Man.


I begun by creating the stamped background. I cut a square of smooth cream coloured card. I stamped the music design on this using a sepia VersaFine ink pad. This stamp isn't part of the Classical Instruments stamp set. I cut the edges using a pair of patterned edge Fiskar scissors. I distressed the edges using the sepia ink pad and a sponge dauber by Stampin' Up.


I stamped the violin image using the sepia ink pad. The stamp is from the Classical Instruments set. I cut this and the brown background panel out using the patterned scissors. I added both parts to the card with double side tape.


The greeting and musical notes are part of the Classical Instruments set. I stamped two strips of the cream card with the musical notes and the musical stamp I used for the background. I used the patterned scissors again and then distressed the edges. I layers all the part up on the card.
Monday 30 August 2010

Sketchy


These are two sketch challenge card I have made, hence my post title 'sketchy'. The card on the left is for Craftwork Cards sketch 7 challenge and the card on the right is for Clare's Sketch challenge on the DoCrafts website.


For Clare's sketch challenge I used the 'Summer Bloom' range by DoCrafts. I made a card with this range last week and I was so pleased with the finished card that I wanted to make another card using the range. The decoupage was put together using 1mm foam pads.The square it was mounted onto was cut using Nestabilities. The white dots were added with a white Sakura pen.


The corners of the green gingham paper were punched using Xcut Corner Punch & Emboss Punch Fleur. For the small circles I used a screw punch to out the holes from green card. To finish the card I added diamond stickles to the centre of the corner flowers.

My second card is for Craftwork Cards sketch 7 challenge. The patterned paper I used is from their 'Grape and Grey' range. All the square panel were matt & layered with silver card. For the plain grey panel I used the reverse side of the foiled paper. The triangles of silver card were embossed using a Cuttlebug swirl embossing folder.


The 'Spikey Flowers' were added with double sided tape. To the centre of the flowers I added silver Card Candy. To finish I added a 'Simply Sayings Birthday' greeting with foam pads.

Sunday 29 August 2010

Patchwork Jenny


This is the birthday card I made for my auntie Jennifer's birthday which is today. Happy Birthday! The stamp set I used was a gift from her. The name of the stamp set is 'Jenny' so I thought it would be ideal for her birthday card.

The stamp set is from the Patchwork Polly range by Jayne Nestorenko and Crafter's Companion. It is such a pretty stamp and I was very pleased with my finished card.


I began by stamping Jenny, her heart bag, the flowers and patchwork squares with Memento ink pad. I coloured them all in with ProMarkers. I used a different colour range to my normal cards. I used an olive, burgundy, peach and lemon tones. I think these colours suited the style of stamp. I cut out Jenny using Nestabilitites and added small dots about the edge with a fineliner pen. I cut out the heart shape bag and attached it to Jenny with a Quickie glue pen.

The main background panel was Kraft card by Stampin' Up. I used the large grid stamp from the set and Rich Razzleberry ink by Stampin' Up to create the pattern.


I added the Kraft panel and Jenny to the scalloped edge card blank. Around the edge of the card I added dots with a fineliner. I added the flowers around the edge of Jenny. Alternate ones were added with 1mm foam pads. The greeting was also added with foam pads. This stamp was also part of the set. The patchwork squares were added with double sided tape.

To finish I added Glossy Accents to the centres of the flowers and patchwork squares.

Saturday 28 August 2010

Birthday wishes


This is a birthday card I've made for a friend at work. I begun by stamping the Hedgehog and the butterflies with Memento ink pad. They were coloured in with ProMarkers. The stamps are from 'Wonderful day' stamp set by Penny Black. I used Nestabilities to cut the the image and the frame. I added white stitching with a white Sakura pen. I cut out each butterfly and added them to the card.


I covered a card blank with green patterned paper. The papers were from the Honey & Hugs range by Papermania. I added stitching with a pear green ProMarker. I punched a strip of white and light green card with my Martha Stewart trellis punch. I edged a strip of patterned paper with the pear green pen. I attached the trellis on the back with double sided tape. I then added this to the card.


To finish I added gold dew drops to the diecut frame. I also added button which has pink ribbon threaded through the holes. On the butterflies I gold Stickles and brown Dimension Pearls. The circle greeting is my Craftwork Cards.

Friday 27 August 2010

Passion for ProMarkers - week 66 challenge


This is my card for this week's Passion for ProMarkers challenge blog. This week's challenge was a sketch challenge and you had to use 'autumn' colours.

I used some of my new craft goodies on this card. I had today off work so thought we'd have a trip out. As usual I managed to fit in a visit to a craft shop. I went to a new one today that I'd not been to before called Pickleberry Crafts. I bought come lovely Making Memories papers and Tim Holtz stamp and tickets. So as soon as I got home I had to get crafting!


The main truck image is a stamp set from Stampin' Up called 'Loads of Love'. This was stamped with a Memento ink pad and coloured in with ProMarkers.

I stamping the main background panel with my new Tim Holtz ticket stamp. I used Kraft card and Old Olive ink pad both my Stampin' Up. I cut panels of Kraft card to take the patterned paper. The papers I used are by Making Memories Paperie range. The centre brown strip is a card which was cut the Fiskers patterned scissors.


I used a sponge dauper and sepia VersaMake ink pad to added a distressed look to the edges. To finish the card I added a ticket from the Tim Holtz idea-ology range and buttons.

A winning end to the week


I've been voted Top Five in The Stamp Man easel card challenge with this card. Yippee! A double winning week.

It's raining outside and I'm off work today so I think it's off to the craft room I go!

Thursday 26 August 2010

Summer Bloom


This is a card I've made using the 'Summer Bloom' range by DoCrafts.

I began by attaching green spotty paper to a square card blank. Across the card I then attached two die cut strips of multi-coloured stripey and pink spotty paper. Onto this I attached the die cut pink spotty paper panel. The scalloped chipboard panel was added on top on these. I used double sided tape to add this. The oval wording panel was also from the Summer Bloom range.


I layered up the butterfly decoupage butterfly with 1mm foam pads. I added some gold highlights with a gold Papermania pen. I also cut out a separate small butterfly from the decoupage sheet and attached this to the card. I also added two small flowers.


To finish the card I added some embellishments. I added a chipboard button to the bottom left corner. The small circle that came out of the button's holes were added to the other corners of the card with glue. Finally I added a chipboard heart and two purple gems to the main panel.

Wednesday 25 August 2010

I'm Top Three! ...again

Good news! I've been voted Top Three this week on the I Love ProMarkers blog. It was my beach hut card that won. Thank you for voting me Top Three. Yippee!!

Monday 23 August 2010

Take note!


This is my first project using my new Cinch binding machine.

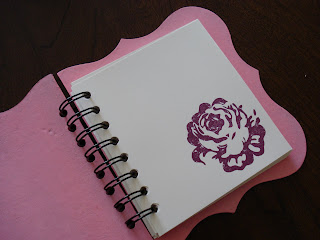
I used Papermania chipboard shapes for the cover. As these covers already had hole in them but weren't in the right place for the Cinch, I cut off the left hand edge straight. I punched the row of holes using the Cinch. I painted the cover pink using acrylic paint. I stamped a small rose directly on the pink covers. I used white Craft stamp pad by Stampin' Up.


The main rose design on the cover was stamped on white card. The stamp set I used was 'A rose is a rose' by Stampin' Up. I cut out the rose and leaf shapes and attached them to the cover using double sided tape.


I cut square of cream paper for the inside. I punched holes in the pages using the Cinch. I stamped roses and leaves on the pages before binding the notebook together.

Sunday 22 August 2010

I love ProMarkers - challenge 28


This is my card for this weeks I love ProMarkers challenge blog. The theme of the challenge was The Seaside. So for this challenge I used 'Beach Hut' set of stamps by Little Claire Designs.

I stamped all the image with Memento ink pad and coloured them in with ProMakers. I cut out each stamped image.


I cut a rectangle of pale blue card for the background. Onto this I attached two pieces of sand coloured card. I used a sponge dauber by Stampin' Up and a sepia VersaFine ink pad to add some shading to the sand.

To finish I added the stamped elements and fineliner details with a Letraset fineliner.

Saturday 21 August 2010

Winter Blues


This is my card for the following challenges
1. Passion for ProMarkers. The theme was 'Winter Blues'. Therefore I chose a winter designs and kept to a blue colour theme.
2. A Gem of a Challenge. This was sketch challenge
3. Pear Tree Designs. For this challenge you had to include 'Best Wishes' on your card.


I began by stamping the image with a Memento ink pad. I stamped the image twice as I added the hat, boots and scarf with foam pads to add dimension to the card. The stamp is 'Winter Milly' by Pink Gem Designs. She was coloured in with ProMarkers.I used Nestabilities to cut out the image and the frame. To finish Milly I added Polar White Flowersoft for snow and various coloured Stickles. I also added white flock to the top of the boots.

The snowflakes design on dark blue panel was stamped with white Craft Stampin' Up ink pad.


I cut two large panels of blue card for the background panels. The snowflakes were cut using my 'Christmas Cheer' Cricut cartridge. These were added to the card with a Quickie Glue pen. The patterned strip with punched using Martha Stewart deep Flower punch. Across the blue centre strip I added a piece of navy ribbon and small white dots. The dots were added using a white Sakura pen.

To finish I added a greeting oval by Craftwork Cards and diamond Stickles top the snowflakes.

Friday 20 August 2010

The Stamp Man Challenge 3


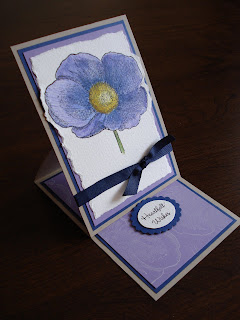
This is my card for this fortnight's The Stamp Man Challenge blog. The theme of the challenge is Easel cards.

The card blank was made using Stampin' Up Kraft card. The base section was made for a strip of card 297x105mm. This was scored in half to made a landscape A6 card. The front panel is A6.


The flower is a stamp by Hero Arts called Engraved Flower. This was stamped with a black VersaFine ink pad onto watercolour paper. I used watercolour pencils to colour the flower in. I tore the edges around the stamped image. This was mounted onto navy, purple and then the Kraft A6 card panel.To finish this panel I added a strip of navy ribbon and a bow.


I used the Engraved Flower stamp again to stamp the purple base panel. I used Stampin' Up white craft ink pad to stamp the image. I used Nestabilities to cut the greeting panel. This was added the the base with foam pads. The greeting stamp was also by Hero Arts.

Wednesday 18 August 2010

A rose is a rose

I have a new blog badge! I was voted Top Three on the I Love ProMarkers blog today. I also won Clare's Weekly Challenge on the DoCrafts website yesterday.Yippee!


My card for today is the Friendship card I made for the August swap on the DoCrafts website. I made it for my swap partner Linda. I received a lovely card from Linda today, thank you Linda.


The stamp set I used for the card is 'A rose is a rose' by Stampin' Up. I have been looking at this stamp in the catalogue for months and I finally deiced to buy it, and I'm so glad I did! The green and dark red colours are also ink pads by Stampin' Up - Old Olive and the new Rich Razzelberry. They are gorgeous colours.

I cut a panel of pink and white for the backgrounds. The scalloped edge was punched using Stampin' Up scalloped edge punch.

I stamped each part of the flowers and leaves separately on smooth white card and cut them out. As the stamp set is a two-part set I used a Stamp-a-ma-jig to line up each part correctly. Each part was added to the card blank to build up the rose corner.


I added a strip of Rich Razzelberry ribbon across the card. I cut ou the letters using my Cricut 'George basics' cartridge. To finish I added a stamped flower to the bottom corner.

Tuesday 17 August 2010

Flowers, just for you


This is my card that I'm entering into this week's,
1. Lili of the Valley Challenge. The theme of the challenge was to reflect a season. I chose summer so I used bright colours and flowers.
2. Clare's Weekly Challenge. This was an inspiration challenge so I used the spots and the bright blue colour from the photo.


I used my 'Teddy with bouquet' LOTV stamp for my card. He was stamped with a Memento ink pad and coloured in with ProMarkers. I stamped the image again and cut out the tag, arms and some of the flowers. I added these to the card with foam pads.I added gold Stickles to the centre of the flowers.

I used Nestabilities to cut out the Teddy and the birthday greeting. I added white dots with a white Sakura pen.


I cut a large panel of blue card for the background. I attached spotty paper to blue card. The paper was from Forever Friends range. The edge was punched using my Martha Stewart deep flower punch. I added additional hole with a screw punch and then threaded ribbon through the holes. To finish I added a bow.

Sunday 15 August 2010

I love ProMarkers - challenge 27


This is my card for this week's I Love ProMarkers challenge. For this challenge you had to use acetate somewhere on the card. I have added an acetate panel to the centre of the card.
The centre section was cut out using Nestabilities. I added the acetate panel behind the cutout and attached it with strong double sided tape. I added small white dots around the card edges with a white Sakura pen. The greeting was cut using my Cricut 'Beyond Birthdays' cartridge.


The Tilda I used was my new 'Japanese Tilda'. She was stamped with a Memento ink pad and coloured in with ProMarkers. I added gold highlights with a gold Sakura pen.


The blossom branch was 'Cherry corner' stamp by Circa Designs. This again was stamped with a Memento ink pad and coloured in with ProMarkers. I stamped a couple of the flowers and leaves again seperatly and attached them to the card.

Friday 13 August 2010

Pear Tree Designs - challenge 12


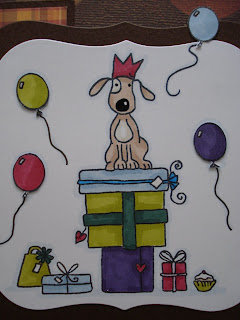
This is my card for Pear Tree Designs - challenge 12. The theme of the challenge is a 'Male theme' card. The stamp I chose to use is 'Doggie Parcels' by Little Claire Designs.


I stamped the image with a Memento ink pad and colour him in with ProMarkers. I chose 'male' colours for the card - shades of browns, reds, blues and olive. I used Nestabilities to out the image and the brown frame. I stamped additional balloons and attached them to the card. I drew in the balloon strings with a fineliner.


I cut a large square of brown card for the background. Onto this I attached panels of patterned paper. Across the centre of the card I added a strip of brown and cream ribbon. I tied a bow with the cream ribbon.

I punched small circles using by Stampin' Up circle punch. I added small thread holes using a screw punch so they looked like buttons. To finish I added a greeting by Craftwork Cards.